Energy Efficient Lighting Solutions & Supply
Energy Efficient Lighting Solutions & Supply


Resources
Rope Light Instructions
The following instructions are here to help you learn how to work with your rope lights and their accessories. Be sure to adapt these instructions as necessary to accommodate the particular type of rope light you are working with, LED vs. incandescent, 2-Wire vs. 3-Wire, etc.

FIND YOUR OPTIMUM ROPE LIGHT LENGTH USING OUR ROPE LIGHT CALCULATOR!
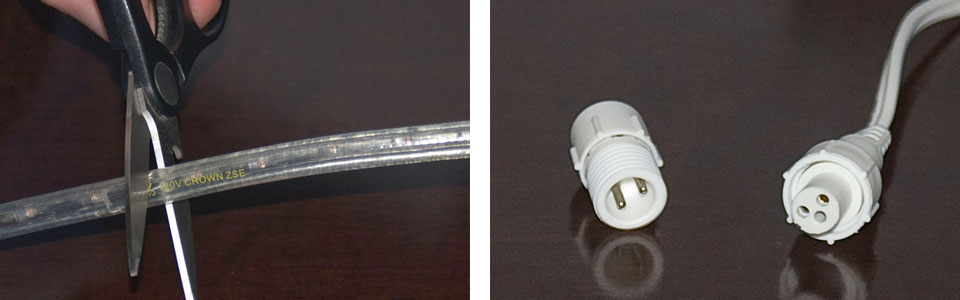
When it comes time to cut your rope light, you will find that at every cuttable interval, there will be tiny scissor icons, dashed lines, or other marking imprinted on the plastic outer tubing indicating where it is safe to cut the rope light. These marks are very small and may be hard to locate at first, but rest assured, they are there. If a rope light is cut in any location other than these pre-designated locations, it will damage that section of rope light and cause it to fail. When you are ready to cut your rope light, use a sharp pair of heavy-duty scissors, garden clippers, or a utility knife to make the cut. Be sure to make a smooth and clean vertical cut. The sharper your cutting blade is, the easier it will be to cut the rope light. Once you have made your cut, you will need to trim the inner wires to allow room for the connectors to insert correctly. Bend the end of the rope light sharply to the side. As you do this, you will see the wires inside the rope light protrude out. Trim off the ends of these wires so that when bending the rope light back again, the wires no longer stick out. This completes cutting the rope light and has prepared the end to receive any accessories that might be attached.
If you are using LED rope lights, note that LEDs are polarized and require the electrical current to be flowing in a particular direction. So if you plug in the power cord and the rope lights do not work, simply remove the power cord from the rope light and connect it to the opposite end.
(Article continues below...)
(Continued from above...)

Rope lights are very flexible products, but they do not bend at 90-degree angles. Always provide a curved radius of at least 3-4 inches when turning a corner. Also, all rope lights generate some heat during operation and they need to be able to dissipate this heat throughout their length. When mounting, do not crowd the rope light and be sure to allow ample "breathing room" around it. This is also applicable in installations where two or more rope lights might run parallel to each other. Again, allow some ventilation room for heat dissipation and do not let the rope lights touch each other as this could potentially cause them to melt or fuse together. (This is the same reason why you should always unspool your roll of rope light before plugging it in.)
When installing rope light into place, it is very important that you do not pull on, tug on, stretch, or excessively flex the rope light! This can stress the inner wires and damage them, the result of which will be immediately burned out sections. And nobody wants that. Rope lights are a very flexible product, but please use care when handling and installing them.
If using rope lighting outdoors, be sure to use waterproof PVC or silicone sealant to secure all connections, power cords and end caps. Add a small bead of sealant on the inside of the connector, slide the rope light in place and then place another small bead along the outside rim to seal the connection. Remember to secure your end caps in the same manner. For added protection, we recommend using dielectric grease on all metal pins prior to inserting into both the rope light and connectors/power cord. This will prevent corrosion of the metal due to any residual moisture present in the connection.
Mounting clips are a general-purpose accessory that can be secured to just about any surface. Using screws or nails, place the clips at constant intervals along the path of the rope light and carefully snap the light into place, making sure the bulbs are facing outward for the best light.
Mounting tracks are very popular when you're looking to mount the rope lights in a nice, straight line. Like the clips, they can be secured to a variety of surfaces with nails, screws, or even strong adhesives. After positioning the tracks into location, carefully snap the rope light into place.
Lastly, the common zip tie is a good choice when neither the mounting clips nor the mounting track are applicable for where the rope lights will be going. There's really no rules to using zip ties. Just secure them to whatever you can, wherever you can, to hold your rope lights in place.
These three methods of mounting rope lights are certainly not the only ways to do it; they are just the three most common. You are certainly open to use your own methods if you like. Just be sure to observe the common mounting guidelines described above.
Important Notes:
- Always unplug the rope light before installing, cutting, or modifying in any way.
- Unroll rope light before attaching to a power source. Do not plug in rope light while it is still wound on the spool as this may melt the rope light.
- Cut only at designated marks.
- End cap must be attached before attaching to a power source.
- Cutting or damaging outer plastic tubing can cause an electrical/fire hazard.
- Do not pull on or stretch rope light as this will damage the inner wires, causing sections to fail.
Rope Light Anatomy 101
How do rope lights work? A rope light is comprised of bulbs (LED or incandescent) spaced along a set of inner wires. Rope lights are divided into sections and are wired in "series parallel". This means that if a bulb fails, only the section it is in will go dark; the rest of the rope light will stay lit. Due to this wiring method, rope lights can only be cut at the dividing points between sections.Basics
A basic run of rope light consists of four main parts. First is the power cord, which plugs your rope light into an outlet to give it power. Next is the power connector, a small plastic unit with metal pins that connect the power cord to the actual rope light. Then there's the rope light itself, followed by the final piece, an end cap, which terminates the run.Cutting Rope Light
One of the most important rules of rope light installation is that rope lights can only be cut in specific intervals. Depending on the type of rope light you're using, this can range anywhere from every 18 inches to every 72 inches. After you have figured out what the ideal amount of rope light is that you are going to need for your project, take a second to make sure this length is divisible by the "cuttable interval" of your particular type of rope light. If it is not, you'll want to round up or down to the nearest interval. (Make sure this new length will still work with your project.)FIND YOUR OPTIMUM ROPE LIGHT LENGTH USING OUR ROPE LIGHT CALCULATOR!
When it comes time to cut your rope light, you will find that at every cuttable interval, there will be tiny scissor icons, dashed lines, or other marking imprinted on the plastic outer tubing indicating where it is safe to cut the rope light. These marks are very small and may be hard to locate at first, but rest assured, they are there. If a rope light is cut in any location other than these pre-designated locations, it will damage that section of rope light and cause it to fail. When you are ready to cut your rope light, use a sharp pair of heavy-duty scissors, garden clippers, or a utility knife to make the cut. Be sure to make a smooth and clean vertical cut. The sharper your cutting blade is, the easier it will be to cut the rope light. Once you have made your cut, you will need to trim the inner wires to allow room for the connectors to insert correctly. Bend the end of the rope light sharply to the side. As you do this, you will see the wires inside the rope light protrude out. Trim off the ends of these wires so that when bending the rope light back again, the wires no longer stick out. This completes cutting the rope light and has prepared the end to receive any accessories that might be attached.
Attaching a Power Cord and Power Connector
The power connector is the key component that links the power cord (along with various other accessories) to the rope light. The easiest way to begin is to attach the connector to the power cord first, then plug the power cord/connector assembly into the rope light. Plug in the "female" end of the power cord into the "male" pins of the power connector and secure with the attached threaded collar. Then separate the screw compression cover from the power connector and slide the cover over the rope light. Align the sharp pins of the connector with the small wire holes of the cut rope light end. Firmly and carefully push the connector and its pins into the rope light, making sure all the pins make contact with the corresponding rope light wires. Then slide the compression cover back over the top of the power connector and screw on. This will compress the power connector and secure it to the rope light. The power cord is designed to be plugged into a standard wall outlet. If you need to hardwire your rope light, simply cut off the plug and strip the outer jacket to expose the wires.If you are using LED rope lights, note that LEDs are polarized and require the electrical current to be flowing in a particular direction. So if you plug in the power cord and the rope lights do not work, simply remove the power cord from the rope light and connect it to the opposite end.
(Article continues below...)
Related Items

(Continued from above...)
Securing an End Cap
End caps are a simple, but important, component of a rope light run. They shield the exposed end of the rope from debris as well as protect any protruding rope light wires from getting snagged. To attach an end cap, simply push it into place around the plastic tubing of the rope light until it stops. Optionally, you can further secure and waterproof the connection using PVC sealant.Other Accessories
There are many accessories that you can incorporate into your rope light design to help shape your rope light vision. These include inline splices, T-connectors, extensions, Y-connectors, etc. While they all provide different functions, the basics of how they attach to the rope lights is the same. Once you understand the basics of how a power cord attaches to a rope light, through the ubiquitous power connector and the alignment of its pins with the wires of the rope light, you'll understand how to attach just about any other accessory. The power connector is the common component in every rope light accessory, and once you know how it works, there's no limit to what you can do.A Brief Guide to Rope Light Accessories
Knowing the basics of how to plug in rope lights makes it easy to hang rope lights in a straight line. But what if you need to trace around curves or attach various sections together? More complex rope light designs, such as outlining architectural features or highlighting landscaping, requires accessories. The most common rope lighting accessories are:- Splice Connector Use this to connect two rope light runs (sections) together
- Invisible Splice Connector This is useful when you need to connect runs in a highly visible space, as it makes the connector less noticeable for a more fluid appearance
- T Connector This accepts three connections; one run is perpendicular to the other two
- X Connector Use this to have four separate runs of rope lights meet at a single intersection
- Y Cord One rope light run forks off into two separate runs
Mounting/Installation
Rope lights can be mounted just about anywhere you can imagine, using a variety of methods, creating unlimited forms and shapes. But no matter how you chose to mount your lights, there are a few guidelines you'll need to follow. After unspooling your rope light, not only should you plug it in to test it, but it is a good idea to keep it plugged in for a few minutes to warm up the outer plastic tubing, making it more pliable. (Be sure to unplug it again before installation.)Rope lights are very flexible products, but they do not bend at 90-degree angles. Always provide a curved radius of at least 3-4 inches when turning a corner. Also, all rope lights generate some heat during operation and they need to be able to dissipate this heat throughout their length. When mounting, do not crowd the rope light and be sure to allow ample "breathing room" around it. This is also applicable in installations where two or more rope lights might run parallel to each other. Again, allow some ventilation room for heat dissipation and do not let the rope lights touch each other as this could potentially cause them to melt or fuse together. (This is the same reason why you should always unspool your roll of rope light before plugging it in.)
When installing rope light into place, it is very important that you do not pull on, tug on, stretch, or excessively flex the rope light! This can stress the inner wires and damage them, the result of which will be immediately burned out sections. And nobody wants that. Rope lights are a very flexible product, but please use care when handling and installing them.
If using rope lighting outdoors, be sure to use waterproof PVC or silicone sealant to secure all connections, power cords and end caps. Add a small bead of sealant on the inside of the connector, slide the rope light in place and then place another small bead along the outside rim to seal the connection. Remember to secure your end caps in the same manner. For added protection, we recommend using dielectric grease on all metal pins prior to inserting into both the rope light and connectors/power cord. This will prevent corrosion of the metal due to any residual moisture present in the connection.
Mounting Accessories
Some of the most common mounting methods for rope lights include mounting clips, mounting tracks, and zip ties.Mounting clips are a general-purpose accessory that can be secured to just about any surface. Using screws or nails, place the clips at constant intervals along the path of the rope light and carefully snap the light into place, making sure the bulbs are facing outward for the best light.
Mounting tracks are very popular when you're looking to mount the rope lights in a nice, straight line. Like the clips, they can be secured to a variety of surfaces with nails, screws, or even strong adhesives. After positioning the tracks into location, carefully snap the rope light into place.
Lastly, the common zip tie is a good choice when neither the mounting clips nor the mounting track are applicable for where the rope lights will be going. There's really no rules to using zip ties. Just secure them to whatever you can, wherever you can, to hold your rope lights in place.
These three methods of mounting rope lights are certainly not the only ways to do it; they are just the three most common. You are certainly open to use your own methods if you like. Just be sure to observe the common mounting guidelines described above.
Controllers
If you're looking to introduce some special effects to your rope light creation, it's time to look at controllers. By itself, a rope light will be in a solid, or "steady-on", state. With the use of a controller, you can have your rope lights flash, fade, chase, and more. Certain controllers will only work with certain types of rope lights. For example, two-wire rope lights can be used with fading or flashing controllers, but not with a chasing controller. Three or more wires are required for advanced effects such as chasing. Refer to the particular controller to see what rope lights it can work with. Attaching rope lights to a controller will usually occur in one of two ways. There can be a standard outlet in the back of the controller into which you simply plug in your rope light power cord. Or there may be an integral rope light power cord and power connector attached to the controller to which you will attach to rope light similar to how you would attach it to a normal power cord.Summary for Outdoor Installation
Refer to our Outdoor Installation Guide for tips on installing rope lights in an outdoor environment.
Sign up for our mailing list to receive product updates, discounts, & more!
 Take Three, Inc. is proud to offer our customers products that have earned the government's ENERGY STAR label.
  SECURE SHOPPING 256 BIT ENCRYPTION
  Copyright © Take Three, Inc. All rights reserved